1 | |
Bind returned ref to desired element using createRef(), useRef(), forwardRef().
1 | |
Bind returned ref to desired element using createRef(), useRef(), forwardRef().
(주로 Reference 글들을 번역/요약하는 방식으로 작성되었습니다)
All declarations are hoisted in JS.
However, var/function/function* are initialized as undefined whereas let/const/class are uninitialized. This means that a ReferenceError exception is thrown when you try to access it before initialization. It will only get initialized when let/const/class statement is evaluated, everything before that is called the temporal dead zone
Reference:
https://stackoverflow.com/questions/31219420/are-variables-declared-with-let-or-const-hoisted
A polyfill is a piece of code (usually Javascript on the Web) used to provide modern functionality on older browsers that do not natively support it.
For example, a polyfill could be used to mimic the functionality of an HTML Canvas element on Microsoft Internet Explorer 7 using a Silverlight plugin, or mimic support for CSS rem units, or text-shadow, or whatever you want.
ex) core-js, babel/polyfill
Reference:
https://blog.bitsrc.io/how-to-write-cross-browser-web-apps-f26f0c5b49cb
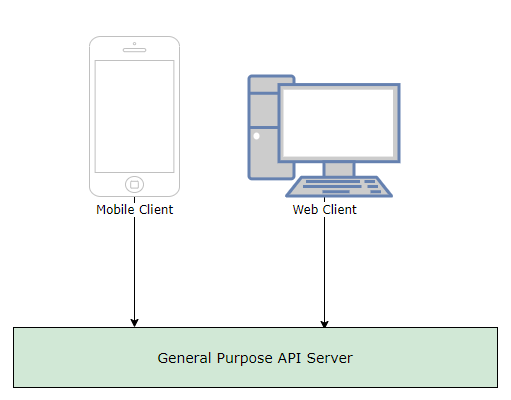
Very simple but hard to maintain monolithic structure as service grows. Adding new features may cause side effects. Builds and tests take forever to run and it takes days to debug test failures.

Microservices are greate for scalability and help solve a bunch of problems. Backend teams are typically responsible for a single service and no longer tripping over each other. Individual microservices are lightweight, customizable, decoupled, and readily extensible
However, there are still boundary issues amongst frontend teams. The responsibility of handling multiple clients is still encoded in one or many services. Frontend engineers are struggling to jam multiple use-cases into a single API layer and the customer experience is beginning to suffer.
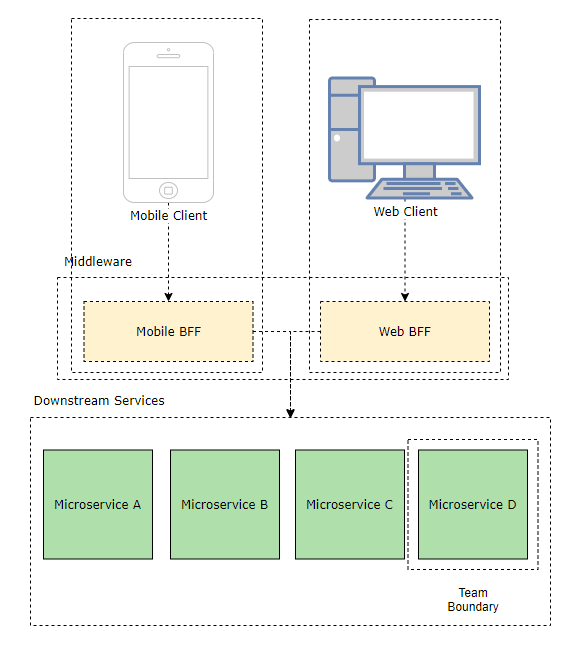
Because our clients have very different needs. The BFF applications are lightweight translation layers that decouple individual clients from downstream services and server only a single frontend.
Benefits:
Reference:
https://medium.com/frontend-at-scale/frontend-architectural-patterns-backend-for-frontend-29679aba886c
CSS의 문법은 배우기 쉽지만 프로젝트가 커짐에 따라 점점 유지보수가 어려워진다. 이러한 CSS의 한계를 보완하기 위해 사용하는 CSS Preprocessor가 SASS이다. SCSS는 SASS의 3번째 버전에서 추가되었는데 SASS의 모든 기능을 지원하면서 CSS구문과 완전히 호환되도록 만들어졌다.
SASS를 사용하면 다음과 같은 기능들을 사용할 수 있다.
SASS는 CSS pre-processor로서, SASS자체로 브라우저에 적용하는 것이 아니라 CSS를 확장해서 쉽고 편리하게 쓰기위해 쓰는 스크립팅 언어이기 때문에 컴파일을 하여 CSS로 변환한뒤 적용된다.

Reference:
https://velog.io/@jch9537/CSS-SCSS-SASS
https://jinminkim-50502.medium.com/css-preprocessor-sass-scss-25dc8329f867
(주로 Reference 글들을 번역/요약하는 방식으로 작성되었습니다)
ExpressJS는 un-opinionated, minimalistic framework로써, 개발자가 올바른 선택을 할 것이라 믿고 맡긴다. 개발자는 자신이 원하는 tools, technologies, middleware 등을 선택하여 적용할 수 있다. 또 Framework에서 강제하는 구조또한 없다. 이는 개인으로 작업할 때는 높은 자유도를 보장해주지만, 팀으로 작업할 때는 의견충돌을 야기할 수 있으며, 큰 프로젝트에 참여하는 경우 각각의 micro-service team들의 project structure와 tool이 달라 다른 팀으로의 이동을 힘들게 한다.
NestJS는 highly opinionated framework이다. 따라서 NestJS는 개발자들이 특정 tool을 사용하고 특정한 방식으로 코드를 작성하도록 가이드한다. 그리고 이미 controller를 try-catch block으로 감싸놓고, request body를 parse하고, error handler, middleware 등을 이미 다 추가해놓았기때문에 매번 새 프로젝트를 시작할때마다 같은 작업을 반복하지 않아도 된다.
추가적으로 아래와 같은 장점이 있다.
p.s. NestJS는 Express를 base로 사용한다고 한다.
Reference:
https://medium.com/monstar-lab-bangladesh-engineering/why-i-choose-nestjs-over-other-node-js-frameworks-6cdbd083ae67
https://codeburst.io/why-you-should-use-nestjs-for-your-next-project-6a0f6c993be
this를 사용할 필요가 없어진다.Reference:
https://blog.bitsrc.io/why-we-switched-to-react-hooks-48798c42c7f
https://overreacted.io/how-are-function-components-different-from-classes/
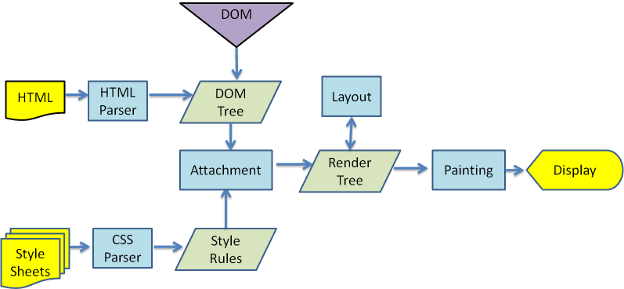
위의 Rendering과정에서 볼 수 있듯이, 만약 DOM에 변화를 주게된다면, Rendering Tree를 만드는 과정부터 다 다시 계산을 해야된다.
Complex SPA에서는 많은 숫자의 DOM manipulation이 일어나게 되는데 이를 매번 실제 DOM에 변화를 주게된다면 매우 비효율적이다.
따라서 DOM manipulation이 필요할 때, 바로바로 실제 DOM에 변화를 주는 것이 아니라 중간에 Virtual DOM을 두고
이를 변경함으로써 일종의 Buffering을 만드는 것이다. 기존에는 30번의 DOM manipulation이 일어났다면,
이 30번을 Virtual DOM에 우선 반영하고, 30번 변경이 된 최종 결과물을 실제 DOM에 반영함으로써 단 1번만 계산을 수행하면 된다.
이 작업은 render function과 화면에 element를 출력하는 작업 사이에 이뤄지며 이를 reconciliation이라고 한다.
Virtual DOM은 offline DOM(in-memory representation)으로 실제로 rendering되는 것이 아니므로 변경하는 비용이 크지 않다.\
Virtual DOM은 DOM을 추상화 한 자바스크립트 객체를 구성하여 사용한다.
업데이트하는 과정은:
Reference:
https://hashnode.com/post/the-one-thing-that-no-one-properly-explains-about-react-why-virtual-dom-cisczhfj41bmssp53mvfwmgrq
https://brunch.co.kr/@eight-two-five/14
Javascript는 언어적 제약사항으로서 생성자에서 super를 호출하기 전에는 this를 사용할 수 없다.\
props를 접근하기 위해 this.props를 사용하게 되는데, 이 this.props는 사용자가 정의한 component가 상속받고 있는 React.Component에 정의되어있다. super()는 자신의 부모의 생성자를 호출하는 것인데, React.Component의 생성자가 super(props)로 넘겨준 props를 자신의 this.prop에 초기화하는 것이고, 이 이후부터 사용자가 정의한 component에서도 this.props를 통해 부모인 React.Component의 this.props를 접근할 수 있게 되는 것이다.\
하지만 React에서는 super(props)를 통해 props를 전달하지 않고, super()만 호출하더라도 this.props를 통해 접근할 수 있는데, 이는 React가 컴포넌트의 생성자 호출 이후 해당 객체에 props속성을 세팅해주기 때문이다.
1 | |
내부적으로 위와같이 처리가 되기 때문에 사용자가 실수로 props를 누락하더라도 정상적으로 작동한다.
Reference:
https://min9nim.github.io/2018/12/super-props/
key는 React가 DOM element들을 식별하기 위해 사용한다. 따라서 만약 리스트의 중간에 element를 추가하거나 삭제했지만 key가 이전과 같이 유지되는 경우 React는 DOM이 변화하지 않은 것으로 인식하고 그대로 보여준다.
예시:
1 | |
index 1의 값이 b에서 z로 바뀌어도 index를 key로 사용하기 때문에 key는 그대로이다.
1 | |
React는 DOM element가 바뀌지 않은것으로 판단한다.
1 | |
또 순서가 바뀌더라도 key는 똑같기때문에 반영되지 않는다.
아래의 3가지 조건이 모두 만족될 경우는 index를 key로 사용해도 안전하다고 한다:
Reference:
https://robinpokorny.medium.com/index-as-a-key-is-an-anti-pattern-e0349aece318
useCallback()과 useMemo()를 사용하여야 하는가?Reference:
https://kentcdodds.com/blog/usememo-and-usecallback
1 | |
Reference: https://heropy.blog/2019/08/17/css-grid/
4줄요약:
Signaling: process of coordination communication. In order for a WebRTC app to set up a call, its client need to exchange the following information:
To avoid redundancy and to maximize compatibility with established technologies, signaling methods and protocols are not specified by WebRTC standards. You can use socket to build signaling services.
RTCPeerConnection: API used by WebRTC apps to create connection between peers and communicate audio and video. RTCPeerConnection has two tasks:
Offer-and-answer mechanism (A is calling B):
RTCPeerConnection objectcreateOffer()setLocalDescription() to send A’s setup to Bsignaling mechanismsetRemoteDescription() so that B’s RTCPeerConnections knows about A’s setupcreateAnswer()setLocalDescription() to send B’s setup to Asignaling mechanismsetRemoteDescription() so that A’s RTCPeerConnection knows about B’s setupVery similar to handshake procedure
ICE framework: framework used to find network interfaces and ports (candidates)
In reality most devices live behind one or more layers of NAT, some have antivirus SW that blocks certain ports and protocols. You can use ICE framework to overcome complexities. To enable this to happen, your app must pass ICE server URLs to RTCPeerConnection. ICE tries to find the best path to connect peers.
ICE tries to find the best path to connect peers. It tries all possibilities in parallel and chooses the most efficient option that works.
STUN server.TURN relay server.STUN: NATs provides an IP address for use within a private local network to a device but this can’t be used externally. You need a public address. WebRTC uses STUN get around this problem. STUN server live on the public internet and check the IP:port address of an incoming request (from an app running behind a NAT) and send that address back as a response. In other words, the app uses a STUN server to discover its IP:port from a public perspective.
TURN: RTCPeerConnection tries to set up direct communication using UDP. if that fails, it tries TCP. if that fails, TURN servers are used to relay data. TURN is used to relay audio, video, and data streaming between peers, not signlaing data. TURN servers have public addresses, so they can be contacted by peers even if the peers are behind firewalls or proxies.
Reference:
www.html5rocks.com/en/tutorials/webrtc/basics/
www.html5rocks.com/en/tutorials/webrtc/infrastructure/
www.html5rocks.com/en/tutorials/webrtc/datachannels/
Janus의 official page에 있는 데모 페이지 소스코드를 읽어보다 official documentation에는 없는 내용이 있어서 기록함.
데모 페이지 소스 코드의 일부:
1 | |
screentest는 pluginHandler인데, send에서 저렇게 일반적으로 보내는 message말고도 success와 error 콜백함수를 보낼 수 있다.
아래는 janus.js안의 코드인데, send의 파라미터로 넘어온 객체 전체를 sendMessage라는 private method에 넘겨준다.
1 | |
그리고 sendMessage에서는:
1 | |
이런식으로 사용한다.
설치하는 과정을 편하게 Dockerfile로 만들었다.
기존에 다른사람이 올려놓은 Dockerfile은 최신 janus와 안맞아서 패키지들을 최신가이드에 맞게 바꿔주었다.
이미지 빌드와 실행은 repository의 readme에 나와있다.
https://github.com/cjsjyh/janus_server
=========================
Official Repository:https://github.com/meetecho/janus-gateway
ReadMe를 따라서 진행하다가 안되서 추가된 부분들이 있다.
aptitude install libmicrohttpd-dev libjansson-dev \ libssl-dev libsrtp-dev libsofia-sip-ua-dev libglib2.0-dev \ libopus-dev libogg-dev libcurl4-openssl-dev liblua5.3-dev \ libconfig-dev pkg-config gengetopt libtool automake
Readme에는 없지만 libnice를 설치하기 위해 추가로 패키지를 설치해야된다
1 | |
libnice 설치:
1 | |
libsrtp 설치:
Readme에 써진대로 1.5.4를 설치하면 최신버전의 openssl을 지원하지 않아 ./configure --prefix=/usr --enable-openssl에서 에러가 난다. 아래처럼 버전을 작성일 기준 가장 최신버전인 2.3.0버전으로 바꿔주었다.
1 | |
저는 http를 사용하여 janus서버와 통신할 것이기 때문에 기타 연결방법을 위한 패키지 설치는 건너뛰도록 하겠습니다.
documentation 빌드를 위한 패키지 설치:
1 | |
doxygen을 그냥 설치하면 가장 최신버전이 깔리는데 그럼 janus에서 에러를 낸다. 에러를 내지 않는 1.8.11버전으로 다운로드를 한다
1 | |
실제 janus패키지 설치:
1 | |
websocket과 data channel은 사용할 수도 있을 것 같아서 제외한 나머지는 비활성화 시켰습니다.
1 | |
--여기서부터 Dockerfile로 넘어가서 작업함–